
Something different for today!! I wanted to show you a stamp I made to decorate paper for a present. I also created one to stamp this other present months ago, and I remembered that that day I told you I wanted to tell you how I made it... So that's how ;)
Let me tell you I'm not an expert with carving or rubber stamps. I made them for fun and to decorate certain presents. I know professional people who specially in it, that use professional tools/materials to make their stamps, but in my case, I use more "at hand" and cheaper items, (excepts for my carving set, which I used during my classes to carve linoleum) like an eraser, so maybe I'm not too orthodox with the technique. In case you are really interested I would recommend you to look for information in blogs, books or internet. There many reliable and inspirational sites ;)
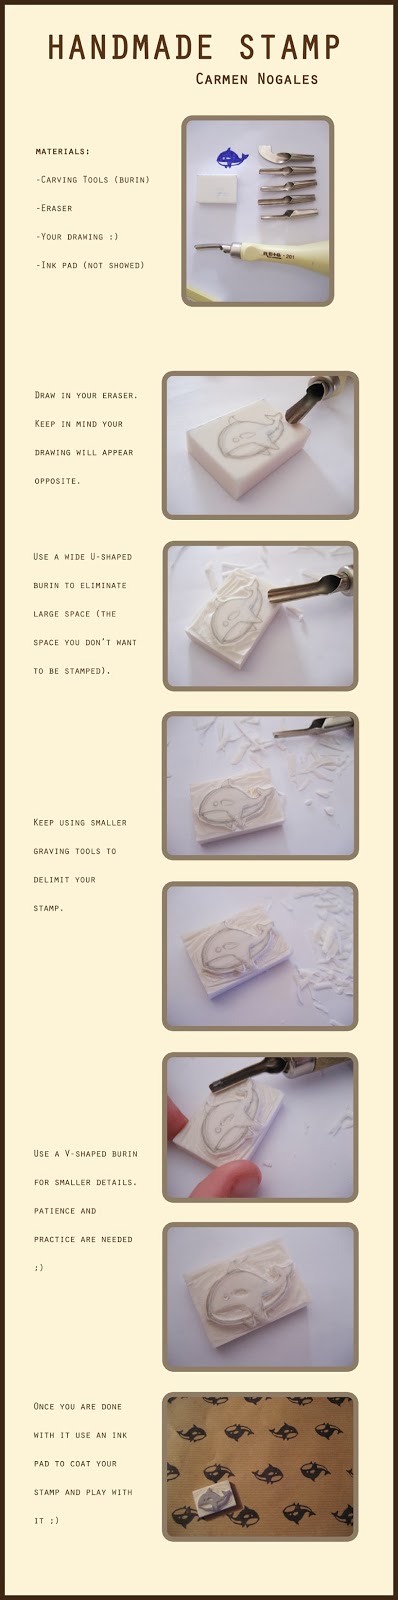
I decided to make some photos during the process of my craving to show them you.
Before anything, I would tell you to start with simpler and bigger illustrations or motif, as those will be easier to carve and will help you to practice and improve :).
Also!! it's very important, be REALLY careful with your hands. Burins are very cutting and you can hurt your fingers in the process. Keep always the hand you are not using to hold your carving tool behind the direction you are cutting or far away of your eraser (in this case). No joke, it can be really painful and dangerous.
Once I'm ready, I start with a sketch, which I transfer to my eraser, keeping always in mind this illustration will end up looking at the opposite side (if in my drawing this orc is looking at your left, when you stamp in, it will look to your right). Be also careful before carving it, and think which part you want to be "transparent" and which one will appear painted. You must ONLY carve "white" spaces.
Time to use your burins!!, I would recommend you to use wider shapes (U-shaped for example) at first, and V-shaped burins detail your stamp. It will be easier at first, but once you keep going you will need to be more and more careful to not "break" your eraser by accident or carving too much on it.
Keep going that way till you are satisfied and use your ink pad (I forgot to photograph it, sorry) pressing a little on it and try to make a first stamp in the paper you choose. Make little changes in it if necessary and start the fun!!
I would recommend you to play with the rotation of your stamp, and the color of it. Be creative and have fun!! ;). You will get addicted once you start.
Once you finish to stamp, clear your rubber to eliminate ink excess.
As I told you, I'm not an expert, but I really have a lot of fun carving to decorate presents. I will show you some photos of my whale stamp and how I decorated the paper in the future, but for now, it's enough for today.
Have fun!!
No comments:
Post a Comment